Making a collaborative Color Grid
Create a color grid and make pixel pictures with friends. As users edit the color grid, changes will be automatically persisted and synced in real-time across clients.
Getting Started
Create a NextJS app and install y-sweet.
npx create-next-app@latest colorgrid --ts --tailwind
cd colorgrid
npm install @y-sweet/sdk @y-sweet/react
Run your app
npm run devEnable state synchronization and persistence
Get a connection string
If you haven’t already, create a Y-Sweet service in the Jamsocket dashboard, go to its page, and click “New connection string”. Give it a description and click “Create”, and copy the connection string. This is a secret key that your app will use to create docs and generate client tokens which give clients the ability to read and write y-sweet documents.
getOrCreateDocAndToken
Replace the contents of src/page.tsx with the following. Pass your connection string key to getOrCreateDocAndToken. Change the definition of CONNECTION_STRING to include your personal connection string.
This connection string is then passed to YDocProvider, which creates a client-side websocket connection. This is how the client speaks to the y-sweet server. In this example, the getClientToken function is a React Server Action, as denoted by the 'use server' directive, which means this function will be executed on the server. In a production application, you will need to perform an auth check at the top of this function just as you would for any API endpoint.
import { getOrCreateDocAndToken } from '@y-sweet/sdk'
import { YDocProvider } from '@y-sweet/react'
import { randomId } from '@/lib/utils'
import { ColorGrid } from './ColorGrid'

// *****************************************************
// ** TODO: Replace this with your connection string **
// *****************************************************
// For simplicity, we are hard-coding the connection string in the
// file. In a real app, you should instead pass this in through a
// secret store or environment variable.
const CONNECTION_STRING = "[paste your connection string]"

export default function Home({ searchParams }: { searchParams: { doc: string } }) {
  const docId = searchParams.doc ?? randomId()
  async function getClientToken() {
    'use server'
    // In a production application, you'd want to authenticate the user and
    // check that they have access to the given doc.
    return await getOrCreateDocAndToken(CONNECTION_STRING, docId)
  }
  return (
    <YDocProvider docId={docId} setQueryParam="doc" authEndpoint={getClientToken}>
      <ColorGrid />
    </YDocProvider>
  )
}
Note that you’ll see errors when you run this code, because we haven’t defined ColorGrid. We’ll do that in the next section.
The Color Grid
Create a Color Grid Component
In another file that runs on the client side with use client, create your color grid component. Using the y-sweet hook useMap to sync client state and persist it across sessions.
'use client'

import { useMap } from '@y-sweet/react'

const GRID_SIZE = 10
const DEFAULT_COLOR = 'white'
// For simplicty, we'll just add one color option
// We'll add the color picker in the next step
const COLOR_SELECTIONS = ['black']

export function ColorGrid() {
  // Initialize our Color Grid as an object of cell positions that map to
  // color values. `useMap` returns a Y.Map, and subscribes the component
  // to changes in that map.
  const items = useMap<string>('colorgrid')

  return (
    <div className="space-y-3 p-4 lg:p-8">
      <div>Color Grid</div>
      <table>
        <tbody>
          {Array.from({ length: GRID_SIZE }, (x, i) => (
            <tr key={i}>
              {Array.from({ length: GRID_SIZE }, (x, j) => {
                // Turn the cell position as a string.
                const key = `${i},${j}`
                const itemColor = items!.get(key)
                return (
                  <td key={key}>
                    <div
                      className="w-8 h-8 cursor-pointer"
                      style={{ backgroundColor: itemColor || DEFAULT_COLOR }}
                      onClick={() => items!.set(key, COLOR_SELECTIONS[0])}
                    />
                  </td>
                )
              })}
            </tr>
          ))}
        </tbody>
      </table>
    </div>
  )
}
Add a color picker
- Add a list of hex color codes to
COLOR_SELECTIONS - Keep selected color in local state, since this information doesn’t need to be persisted across clients
- Set the value for a selected cell the active color
onClick
'use client'

import { useMap } from '@y-sweet/react'
import { useState } from 'react'

const GRID_SIZE = 10
const COLOR_SELECTIONS = ['#500724', '#831843', '#9d174d', '#be185d', '#db2777', '#f472b6', '#f9a8d4', null]
const DEFAULT_COLOR = 'white'

export function ColorGrid() {
  // Initialize our Color Grid as an object of cell positions that map to
  // color values. `useMap` returns a Y.Map, and subscribes the component
  // to changes in that map.
  const items = useMap<string>('colorgrid')
  // Keep the selected color as local state.
  const [selectedColor, setSelectedColor] = useState<string | null>(COLOR_SELECTIONS[0])

  return (
    <div className="space-y-3 p-4 lg:p-8">
      <div>Color Grid</div>
      <div className="space-x-2 flex flex-row">
        {COLOR_SELECTIONS.map((c) => (
          <div
            key={c}
            className={`w-8 h-8 cursor-pointer ring-2 ring-offset-1 ${
              c === selectedColor ? 'ring-pink-100' : 'ring-transparent'
            }`}
            style={{ backgroundColor: c ?? DEFAULT_COLOR }}
            onClick={() => setSelectedColor(c)}
          />
        ))}
      </div>
      <table>
        <tbody>
          {Array.from({ length: GRID_SIZE }, (x, i) => (
            <tr key={i}>
              {Array.from({ length: GRID_SIZE }, (x, j) => {
                // Turn the cell position as a string.
                const key = `${i},${j}`
                const item = items!.get(key)
                return (
                  <td key={key}>
                    <div
                      className="w-8 h-8 cursor-pointer"
                      style={{ backgroundColor: item || DEFAULT_COLOR }}
                      onClick={() => {
                        if (selectedColor === null) {
                          items!.delete(key)
                        } else {
                          items!.set(key, selectedColor)
                        }
                      }}
                    />
                  </td>
                )
              })}
            </tr>
          ))}
        </tbody>
      </table>
    </div>
  )
}
Run the app
We have enough here to test the to-do list.
Run npm run dev and navigate to localhost:3000 or whichever port you’re running on.
When you load the page, you’ll notice a ?doc=... parameter appended to the url. This is a document ID automatically created by getOrCreateDocAndToken. If this ID is supplied in the url, the same doc will appear. Otherwise, a new doc will be created.
Using the debugger
In the developer tools, you’ll find a link to the Y-Sweet Debugger. You can use it to inspect the state of your app.
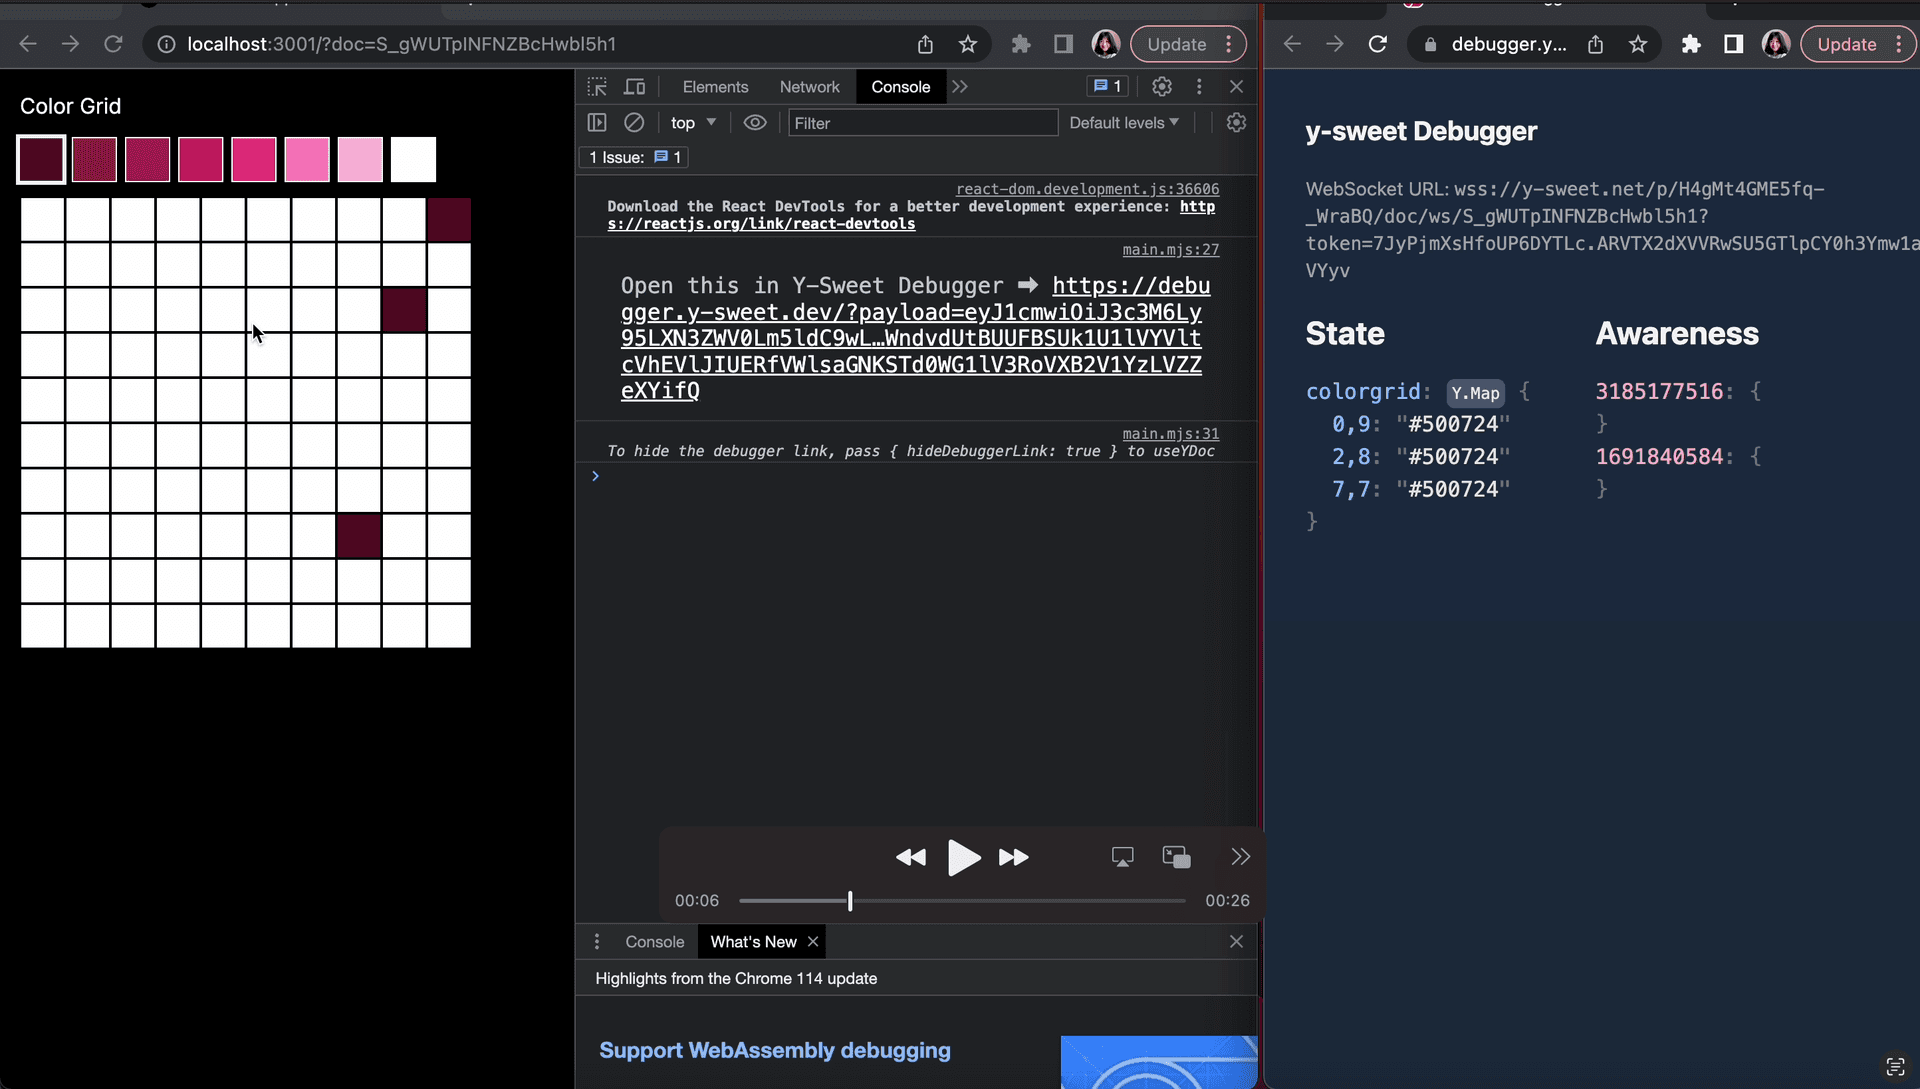
How to open developer tools:
Next Steps
Refer to our Color Grid demo
You can see all the code in action in our color grid demo and style your Color Grid to match the cover image.